
5 DIY Christmas Decorations for the Whole Family
The holiday season is a great reason to get the family together and create some memories.
The holiday season is a great reason to get the family together and create some memories. Here at MDREPros, we’re always providing ways to make your house feel like a home with some home décor tips. Today, we bring you some great DIY Christmas decorations that you can make as a family!
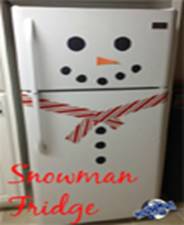
Snowman Fridge
Supplies: construction paper, patterned paper, tape or magnets
Instructions: This project is as simple as it looks, and is sure to bring a smile to your kitchen all season long! Cut out eyes, a nose, some buttons, and maybe a top hat and a scarf. Place them on the fridge with either some sticky magnets (available in any craft store) or scotch tape (it’ll peel right off). Inspiration for this project came from Pinterest.
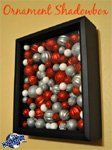
Ornament Shadowbox
Supplies: shadowbox, ornaments, stenciling
Instructions: Our shadowbox idea from Father’s Day was such a hit, we thought we’d put a holiday spin on it. Pick a variety of different sizes and textures for the ornaments (although you’ll probably want to stick to a certain color theme), and then have the kids pick the order they want to put them in. If you decide to post text on the shadowbox, you can give the sticker letters to the eldest kid. Inspiration for this project also came from Pinterest.
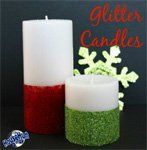
Glitter Candles
Supplies: candles, painter’s tape, Mod Podge (glue), glitter
Instructions: Take plain white candles (usually available for about a dollar), and cover the top portion with painter’s tape. You’ll only want to glitter-fy the bottom third a half. Spread Mod Podge paste over the visible part of the candle, nice and even. Proceed to roll the candle through green, red, or gold glitter. Shake off the excess and let it sit to dry. The more of these you make, the more stunning it will look. For more complete instructions, visit Create.Craft.Love.
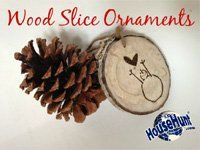
Wood Slice Ornaments
Supplies: wood slices, eye hooks OR a drill, string or ribbon, sharpie OR wood burner
Instructions: You can buy wood slices from any craft stores, or you can buy/find branches and cut them yourself. If you have an older kid, he may want to drill holes in the top of each wood slice. Then draw pictures, designs, Scripture, etc. on each of the wood pieces. Encourage each of your kids to be unique and expressive. Then tie the ribbon or string around for a loop. Have the kids place their creations wherever they’d like on the Christmas tree. For more complete instructions, visit UpcycledTreasures.
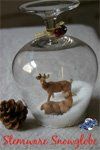
Stemware Snowglobe
Supplies: wine glasses, small figurines (reindeer, Christmas characters, Olaf, etc.), cardboard, artificial snow OR glitter, white glue
Instructions: This one is more targeted for your older kids. Cut a circular piece of cardboard, just a bit wider than the lip of your stemware. Glue your figurines to the cardboard and wait for them to dry. Fill the glass a quarter to a third full with your fake snow or glitter. Put a circular glue ring near the edge of your cardboard and place it face down into the glass. Flip it over and wait for it to dry. You can use the base of the stemware as a candle holder, or let the wine glass snowglobes stand by themselves. For more pictures and directions, check out Family Chic.
We hope these crafts provide a fun activity around the holidays, and that they add to your home décor in return! Share links to any other family crafts that are a part of your trad
Maryland Real Estate Professionals Real Estate Outlook